
Context:
This is a high-level step by step configuration guide for a SSID tunneling solution using Meraki.
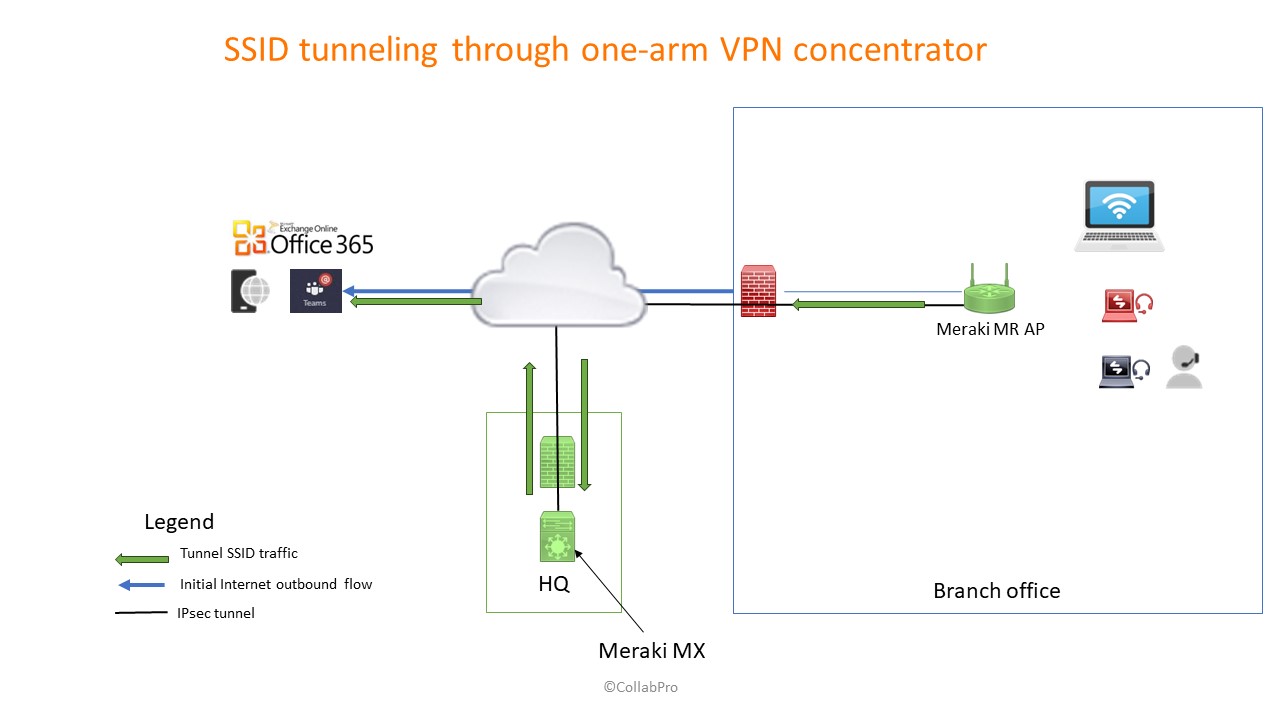
In our scenario, a Meraki access point is configured and connected to Internet in a Remote Branch.
The Meraki access point receives its own IP from the branch DHCP and connects to the Meraki VPN concentrator in the HQ, establishing a secure IPsec tunnel. As per configuration choice, all traffic from the device connected to the SSID is hauled through the IPsec tunnel to the HQ Meraki VPN concentrator.
HQ site
The Meraki MX device (MX64 in our case) is connected to the Internet router via the WAN port. In an one armed scenario, this is the only connexion the MX has. The IP address on the WAN port is a private IP address. No inbound Internet connection rule configuration is required on the Internet router in from of the MX VPN concentrator for the Access Point IPsec tunnel to mount apart the ports required to communicate with the Meraki cloud.
UDP Inbound ports Source: UDP port range 32768-61000; Destination: UDP port range 9350-9381 should be opened at the HQ site for the IPsec tunnel establishment phase (see Meraki VPN registry picture).
Out of the scope for the current setup, if you need client VPN connectivity to the VPN Concentrator, port UDP 500 and 4500 for IPsec need to be mapped from the Internet router to the private WAN IP of the MX64.
The VPN concentrator can be used for SSID tunneling AND Client VPN connectivity in the same time.
No site-to-site VPN connectivity configured.
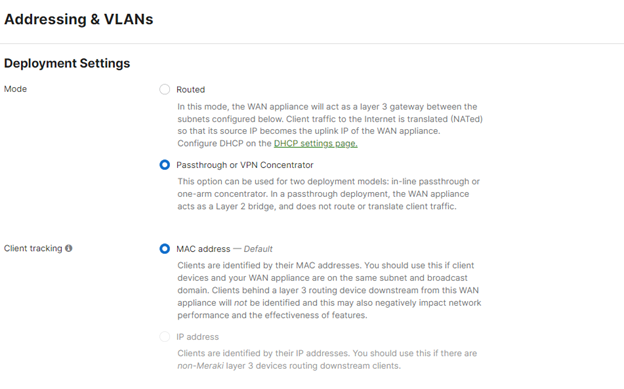
The Meraki MX 64 is configured as VPN concentrator – pass through. In this mode AMP and content filtering functionalities are not working. Do not buy an advance security licence for the MX firewall in this scenario. The security, firewall and IDS/IPS services are not done by the MX device in this scenario, in spite of the fact that you can opt to have control of Layer 3 and Layer 7 rules for the passthrough traffic.
The DHCP services cannot be enabled on the MX in passthrough mode. As such, a Wi-Fi device from the branch AP will request an IP through the IPsec tunnel end the MX device, the DHCP server from HQ located o the external WAN segment of the MX will be providing IP addresses for the branch clients.
Configuration Pre-requirements
– devices have been added to the Meraki dashboard inventory and required licenses have been installed.
Configuration steps Access Point Meraki
- Create new network and add access point to the new network
- Go to Access Control and configure the SSID.
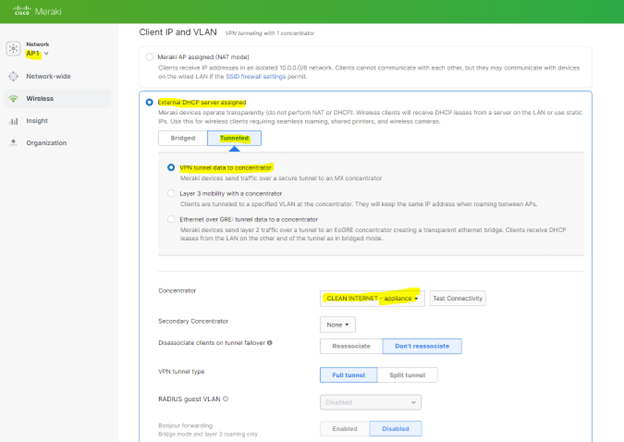
- Navigate to Wireless > Configure > Access control> Client IP and VLAN and select External DHCP server assigned
- Click Tunneled, and select VPN tunnel data to concentrator
- Select the MX security appliance concentrator that exists within the same Dashboard organization
Configuration steps MX appliance
GO to addresses and VLAN: Security & SD-WAN > Configure > Addressing & VLANs Page. The MX will be set to operate in Routed mode by default.
Go to Security & SD-WAN > Wireless concentrator and select Automatic
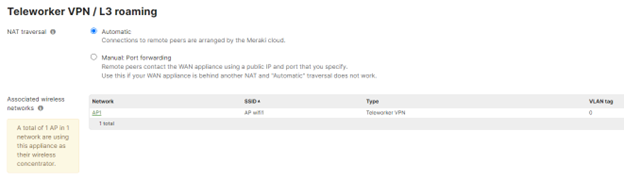
The choice of Automatic will result in the communications flow below, during an IPsec Tunnel auto configuration between the remote AP and the MX concentrator in the HQ location.
The following configuration guides from Meraki were used to complete the configuration"
https://documentation.meraki.com/MX/Deployment_Guides/VPN_Concentrator_Deployment_Guide